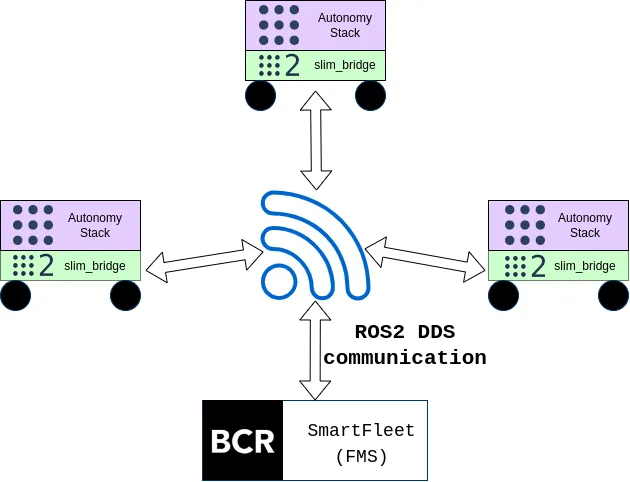
As you may know, we at Black Coffee Robotics love Gazebo and write quite frequently about it. We’ve completed many varied and complex robotics projects in the past, and the starting point for most of these projects was a gazebo simulation. We’ve successfully simulated drones, boats, robot arms, and even fleets of 100+ AMRs in Gazebo.
One recurring challenge that we faced was Gazebo being slow and computationally heavy. Running your robot in a slow simulation environment has a lot of downsides. These include the following issues:
- Some time-sensitive control algorithms don’t work correctly or give an unstable result in a low real-time factor.
- Difficulty in scaling to multiple robots (in case of fleets of robots) or more complex environmental features.
- Difficulty in development with low-powered laptops.
- Less visually appealing simulations due to frame rate drop.

Over time we have come up with many optimizations to speed up Gazebo to solve these problems.
- Downscaling meshes
- Hardware Acceleration in Docker
- Efficient Spawning and Deletion of Models
- Reducing Lighting Sources and Disabling Shadows
- Other Optimizations
Downscaling Meshes
A standard practice of creating URDFs for robots is creating CAD files in software like SolidWorks or Fusion360 and using their respective URDF converters. In addition, people import design meshes from popular free model libraries such as 3dWarehouse and GrabCAD.
These meshes imported have a very high face count and are not optimised for launch in Gazebo. The more complex mesh you spawn in Gazebo, the greater the computational time needed to determine potential collisions and rendering. Therefore, it is always good practice to downscale any mesh you import into the simulator.
To provide context, Blender is an open-source 3D creation suite with various modelling, animation, rendering, video editing, and more tools.
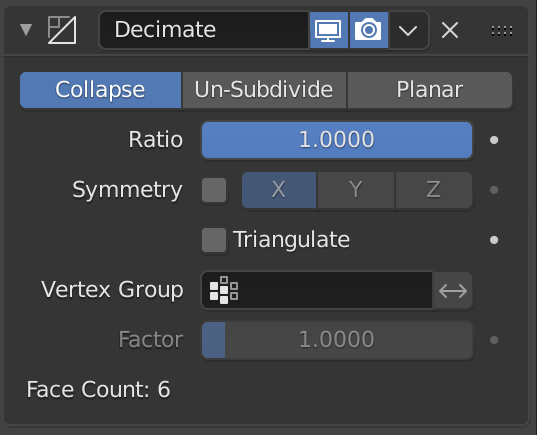
We use the Decimate Modifier function to downscale meshes provided by the said suite to reduce the number of faces in the robotic meshes. There are mainly three types of methods by which you can Decimate or modify.
Out of the three subparts, the ideal method for our use case is the Collapse function, which reduces meshes depending upon a ratio.
A simplistic model was chosen to downscale for a more pronounced effect; however, in reality, robot meshes and design meshes have a lot of faces to begin with.
The order of magnitude of these faces is in the range of millions. Hence it results in virtually no change in appearance after reducing the model ratio significantly. Depending upon your mesh size, this method can boost your simulation substantially.
However, as shown in the above demonstration, there is a slight tradeoff in collision checking. In addition, if your algorithm depends on accurately determining the contours of the said object in question, then it is a good idea not to reduce the Collapse ratio significantly.
Hardware Acceleration in Docker
Since we work on varying ROS and ROS2 distros simultaneously, we do all our development in Docker. If you plan on running Gazebo or even Rviz in Docker, GPU support is essential to get the best results. ROS has a nice tutorial for hardware acceleration for dockers. Paraphrasing the important parts:
For Nvidia systems:
- Configure Nvidia Container Toolkit with your Docker from the following documentation page.
- Add the following environment variables to your Dockerfile on build:
# nvidia-container-runtimeENV NVIDIA_VISIBLE_DEVICES \
${NVIDIA_VISIBLE_DEVICES:-all}
ENV NVIDIA_DRIVER_CAPABILITIES \
${NVIDIA_DRIVER_CAPABILITIES:+$NVIDIA_DRIVER_CAPABILITIES,}graphics
- Finally, configure your container to use Nvidia GPU Drivers:
docker run -it --privileged --net=host \
--name test_image_container \
--env="QT_X11_NO_MITSHM=1" \
--env="DISPLAY" \
--runtime=nvidia \
test_image:latest
For Intel systems:
- Install the following drivers in your Dockerfile:
apt-get -y install libgl1-mesa-glx libgl1-mesa-dri
- Finally, configure your container to use Intel GPU Drivers:
docker run -it --privileged --net=host \
--name test_image_container \
--env="QT_X11_NO_MITSHM=1" \
--env="DISPLAY" \
--volume=/tmp/.X11-unix:/tmp/.X11-unix \
--device=/dev/dri:/dev/dri \
test_image:latest
This dramatically improves the simulation by achieving much higher rendering frame rates, increases Gazebo’s real-time factor and reduces CPU load.
Efficient Spawning and Deletion of Models
A simplistic way to spawn and delete models is to use the SpawnModel and DeleteModel services provided by Gazebo ROS API.
As you can see below, there is a slight delay in spawning these gazebo models. This is the same case while deleting the models as well.
This seems like little, but when cascaded between hundreds of obstacles, this will significantly impede the loading time of your simulation as well as the logical aspect of it.
To efficiently tackle this issue, we use the WorldPlugin provided by Gazebo. This removes the cooldown when you spam the ros service to spawn or delete models. This is because the plugin provides access to all the models in the scene and gives us a more direct API to the system. As a result, we can instantly generate and delete all models with ease.

Reducing Lighting Sources and Disabling Shadows
An abundance of lighting sources in simulation is a significant cause for lowering the real-time factor in Gazebo.
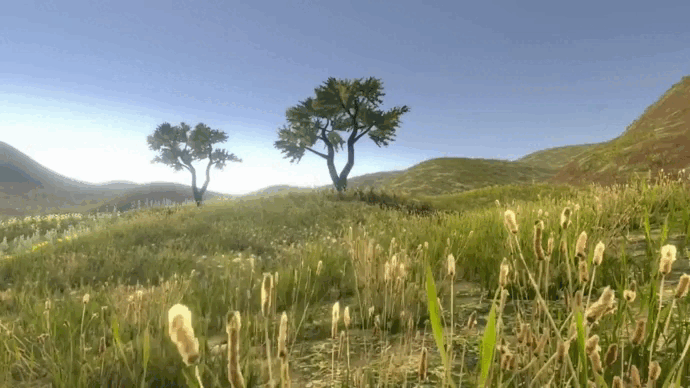
Make sure to use minimal light sources as long as your perception algorithms perform optimally. Only proceed to add sources of directional light if you cannot modify the default Sun model’s range and attenuation parameters to achieve your end cause.
The performance of vision-based algorithms such as image segmentation using Deep Learning Models or Visual SLAM depends on the amount of light in the environment, so this method will not be very useful in those cases. If your use case does not cover vision-based methods of approach, then the above solution may prove helpful.
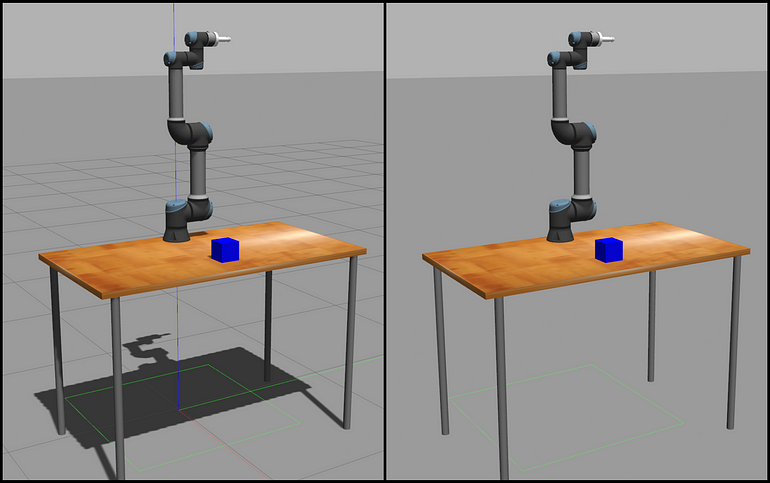
Disabling shadows also boosts the rendering FPS, especially when launching the simulation in CPU-only modes.
To disable shadows, modify the scene attributes as follows:
<scene>
<shadows>0</shadows>
<grid>false</grid>
<origin_visual>false</origin_visual>
</scene>
In addition, you can further limit aesthetic features in your simulation by removing the origin visual and embedded grid in the default world provided. This tip will trade off a bit of aesthetics for performance, so you should skip this while recording your next viral demo video.
Other Optimizations
These are very minimal steps and good practices that can be applied to your Gazebo world.
Setting the initial pose of your camera
On every launch, it is tedious to match the Gazebo Camera to face the model you are working on in the Simulation.
To correct this, we save the gazebo camera pose in the world file to save panning and zooming time.
<gui>
<camera name="gzclient_camera"><pose>1.53 0 2.25 0 0.64 -3.1414</pose></camera>
</gui>
These are obtained by expanding the GUI section of the left World Tab and noting down the camera pose values.
Choosing the right hardware specifications to emulate
Whether you are trying to mimic an AMR, AGV, or a Robotic Arm, it is imperative to determine which hardware properties of a real-life sensor you want to emulate in Gazebo. The true bottleneck arises in simulating cameras, pointclouds, and laser scans.
For Cameras and PointCloud Sensors
- Reduction of max clipping distance
- Reducing update rate
- Limiting the horizontal and vertical field of view
- Downsizing the resolution of the output image (only for cameras)
For LiDAR sensors
- Reducing maximum range
- Reducing update rate
- Adjusting angular resolution (ideally set to 1°)
- Set the sample size as a multiple of your maximum range (ideally lower, the better for the Simulation).
- For instance, if your maximum angular range is 360°, set the sample size to be a factor of 360, say 720 + 1 (to account for zero index) samples.
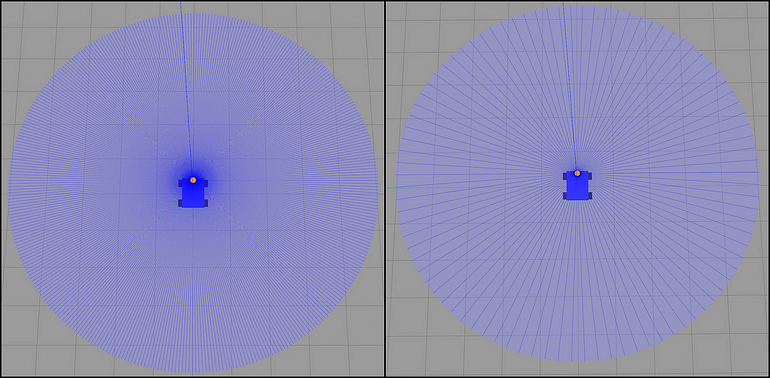
There’s an obvious tradeoff with this method because it deviates the simulation from real robots, and the behaviour of certain perception algorithms can degrade many of the sensors it relies upon are low resolution.
Conclusion
The methods mentioned here can only be applied for some use cases, as most optimizations are weighed against sensor accuracy and aesthetic design. So, choose the methods here that match your use case.
In addition, several other controllable levers in the Gazebo ecosystem can improve performance. However, such changes can be specific to the simulated robotic system. For example, improving the performance of a robot arm while maintaining the necessary physics update would be different from simulating a 3D LiDAR in an outdoor scene.
If your work involves developing large or intricate simulations and your system needs a performance boost — reach out to us!

.jpg)